stuff(winkyy~

I have but one purpose in this life, seeking the nature of the world.

0%

talk about cookies

it’s well known that cookies are used to trace users, maintain user sessions, to support stateful features, in a stateless http environment.

and considering it’s part of the infrastructure, we don’t have a chance to dig into it often. i recently did something related to cross site request, and tried to solve some of the compatibility issues. so here comes a share.

some consensus

cookies are actually special headers of request, can only set by server side using response headers with specific rules of your own. say user login success, and server response with headers like:

set-cookie: __hostname=value; Path=/; Expires=Wed, 07 Jul 2021 01:42:19 GMT; HttpOnly; Secure; SameSite=Lax

by standard, server can only set one cookie for each request-response.

and with detailed information, browsers will automatically decide whether should set cookie header or not, and which ones should set.

the example above is some kind of common usage. and i think we can look into details now.

in conclusion, a common practice should looks like:

1
2
3
4
5
6
7
res.setHeader('Set-Cookie', '__hostname=cookie', {
httpOnly: true,
maxAge,
path: '/',
sameSite: 'lax',
secure: true,
}));

domain

it’s allowed to set domain attribute to specific cookie share between domain and subdomain like xxx.com and sub.xxx.com, but we should really avoid to do this, for compatibility concern.

in elder rfc standard, if set xxx.com, then sub.xxx.com can’t use this cookie; if set .xxx.com then sub.xxx.com or anything.xxx.com can use cookie, while xxx.com can’t.

in newer rfc standard, the only difference is that if set .xxx.com, xxx.com can still use this cookie.

so in short, some grandpa browsers may implement differently, and therefore may lead to some weird bugs.

best practice in real world, is trying to implement full site same domain. it could be tricky to implment full site cdn, but we usually host static data on cdn, so it won’t bother much if your cdn can’t use same cookie as your main site.

expires/maxAge

they are actually the same thing, to decide how long this session you want to maintain. by default, most browsers will expire it when users close the page if you don’t set any.

they shares the same duty, the difference is that expires uses Date while maxAge uses Number. maxAge takes precedence if both set. here it’s better to use maxAge only, to save a little bytes for requests.

path

a funny thing is that this attribute only narrow down the routes cookies should set. we should do that on server side even if there are requirements anyway. so it’s set as / for most time.

httpOnly

should set to forbid client access cookie. like always. never trust clients lol

secure

https only. if you are not using https, please do. i can write another post to point out the benifits. but let’s focus on the topic now.

sameSite

it could be lax/strict/none.

lax allow frames with cookie, while strict doesn’t.

none is used for cross-site requests, and only allowed when secure is set.

usually lax suits most situations.

notice that some grandpa browsers doesn’t support sameSite attribute, and may not be able to set cookie if it contained any sameSite sttribute. so it would be helpful with some compatibility problems if server check UA to decide whether use this attribute.

normally we use Access-Control series headers to solve cors problems, some website just use Access-Control-Allow-Origin: * to allow all request from any origin.

this mostly happens in cdn requests, so it is ok in most cases. however, if we do provide service for different origin site with cookie verification, it won’t work with wildcard. beside, some bad guy can abuse your cdn if you don’t have any protection. so a better choice than Access-Control-Allow-Origin: * is maintain a whitelist. check origin site when server recieve a request, and set specific allow origin. say

1
2
3
4
5
6
7
const { origin } = req.headers;
if (!whilelist.includes(origin)) {
res.writeHead(404);
res.end();
return;
}
res.setHeader('Access-Control-Allow-Origin', origin);

chrome support sameSite attribute to avoid CSRF attack. if we want to support cross site request with cookie, there is one more thing we need to consider.

configuring sameSite=none, all websites have the possibility to request your apis, even from phishing.com. attackers may build a very similar website as your real one, and mislead users to click some dangerous button. so apart from that configuring, we also need to check the origin that requesting these sameSite=none apis, if it is not in the whitelist, ignore the cookie too.

epilogue

maybe you have noticed that some of the websites now showing a hint when you first entering their pages, saying you can choose or not, to allow website uses cookie. yes people nowadays more privacy-conscious, and i think there is going to be some standard later, to forbid big companies collect user information.

cookies exists for a long long time, maybe a little outdated. google are trying to establish some new mechanism to avoid abusement of cookies, export several specific api in browsers to support login, user trace, etc. it seems promising i have to say, but a bad fact is that there are still tons of users using ie. which means those compatibility issues may still there for a long long time lol.

anyway thanks for your reading. seeya

apart from those daily talking, i want to introduce you a few practices lately used to speed our website up

ssl inital issue

nowadays we are using let’s encrypt a lot, as both safety and free certification. it IS a good choice, for starters, or non-profitable organizations.

usually it’s ok, unless server of let’s encrypt is too slow.

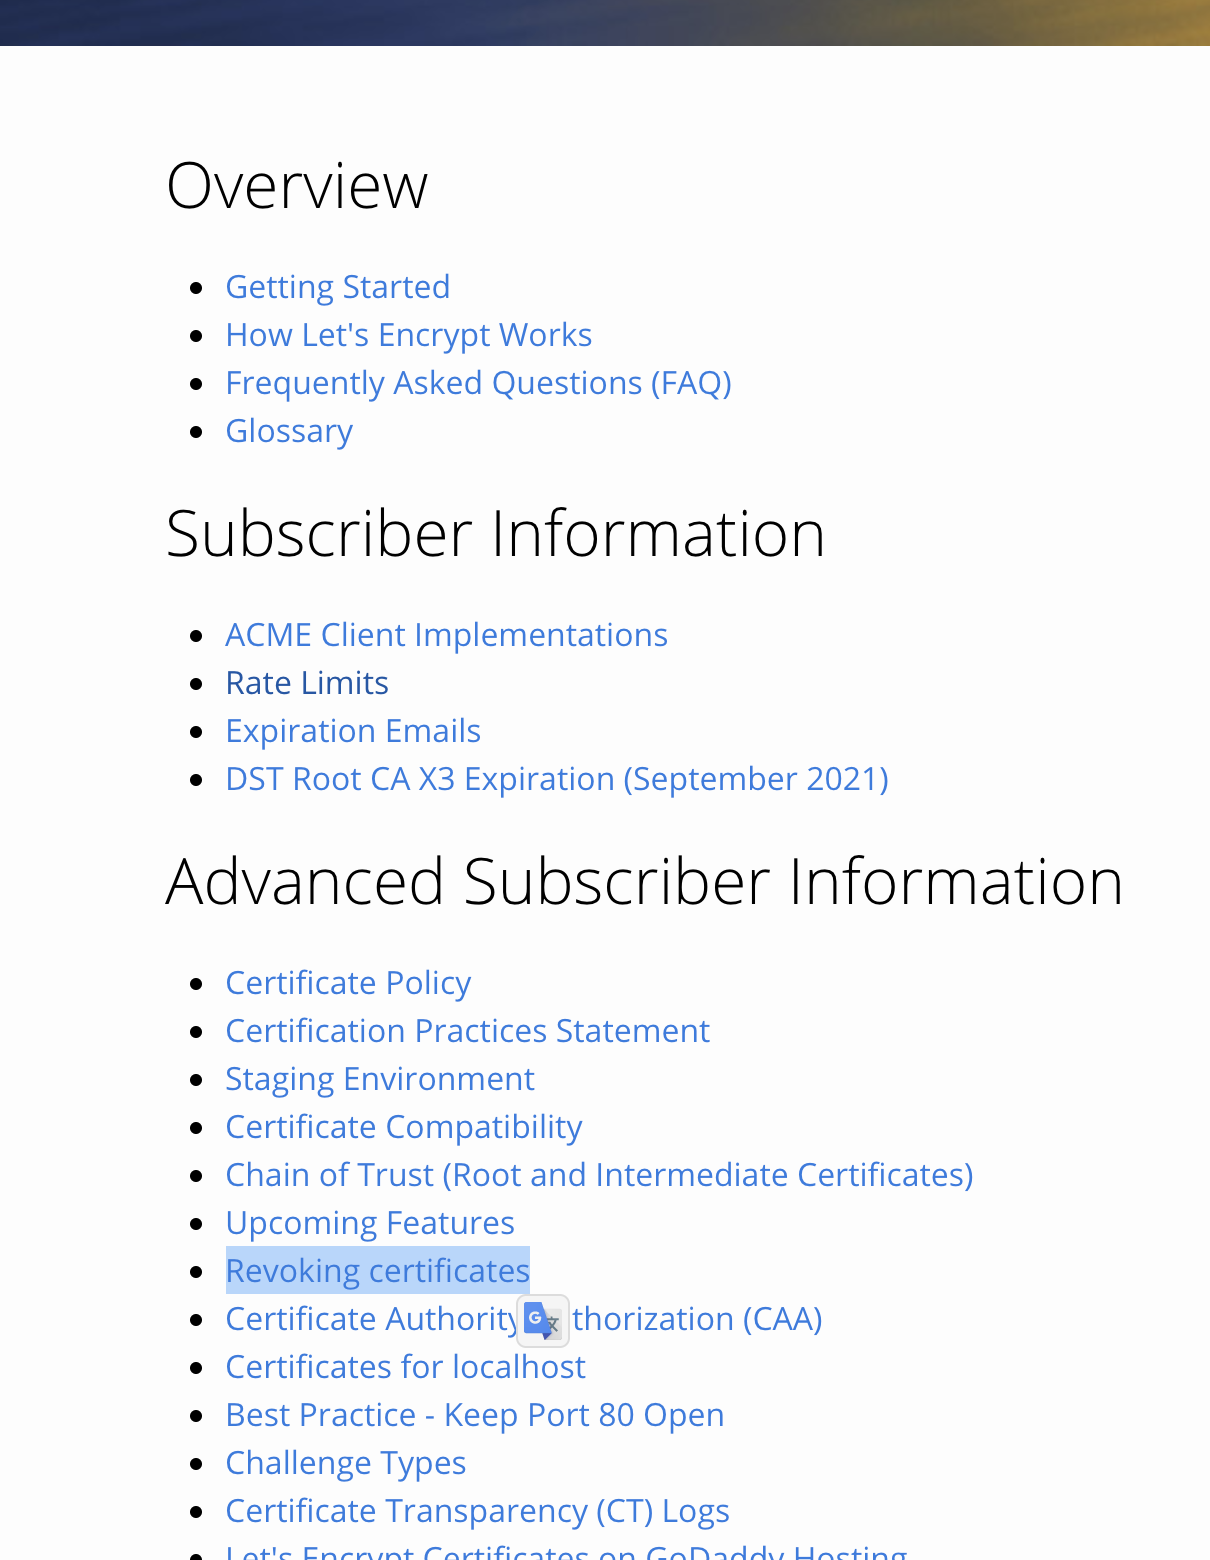
why the hell are we talking about server of let’s encrypt? let’s go back to the documents of it:

damn yes, the revoke process! people may take the risks of being cheat by a revoked certification. most of the modern browsers will just go check if it’s still valid sometimes. (which make it difficult to reproduce: it only checks once in a long time; and it’s hard to tell when server of let’s encrypt crushed or just too slow)

so here comes one choice: enable OCSP Stapling option on your reverse proxy server, so it will fetch the result for all clients before requests coming.

then again, your server may have some connection issues with server of let’s encrypt. and occasionally, users may still encounter the same issue, just before your server get the result.

so here comes an advice: if you do need to ensure ssl issue won’t happen on your server at any cost, just buy a certification from local enterprise. (sadly, we can’t even sure if those providers are part of the reasons why we connect let’s encrypt. QwQ)

if it’s not so important, just enable OCSP stapling. it works well most time anyway lol

adaptive size images

now things are going to be wild, stay still amigo.
we know it’s really easy to resize a image in front end, using some html codes like:

1
<img src = 'image/example.png' width = 400, height = 200>

it seems ok for users. but unfortunately, browsers will still download the original unoptimized images, which may takes more than 20mb each!

to reduce the size of clients really need to download, ideally, we need to host different sizes of images. and for new browsers, there are more to do! say chrome support a new compressed format avif, which is even smaller than webp! (i think avif is developed by google itself too)

we are not going to dig into the details of each format, we chosen squoosh-cli as our solution, and made some changes to make it possible to run in browsers, because:

  1. we need multiple formats support, which shares some fimilar interfaces, so it won’t take too long to integrate, and have backups for older version of browsers

  2. it should be able to run in browsers, so it could be able to implement some kind of offline mode creations, which also saves both users’ time and our server resources

(yes, we support PWA too, which is another optimization, but not really nessesary to talk here, since it’s not such a common scenario which most website may need to consider)

i believe there would be more options if you really want best performance, but we will continue the topic here.

so for the content server, we added a proxy level, to handle those image requests, say a chrome is requesting image_tiny.avif, the content server will go check if it exists. if not, return the original image, and start a processor to compress the tiny image. the next time it will response a tiny image instead.

of course it doesn’t have to be tiny, you can set up a serial of image sizes according to your real business. and apart from images, there could be a similar optimization on audio/video. we used ffmpeg on that. but video optimization could be tricky, and may have to realated to cdn stuff, or some higher level optimization. so we won’t discuss those here.

and we still need to be prepared for potential attack. we need to limit the resources this compress process can use, and we need to add a message queue for traffic peaking, which is for operation guys lol, just mention here in case you wrote some stupid code and blame on me looolll

others

we have seen many ways to speed our website up, some could be common and useful, like things above. some could be okay but not significant good, like server push, links here if you do want to read. and some is not that easy to conclude, say cache, mq, better sqls, which are based on real scenario, and may not be useful for all of you.

anyway i hope this really help you guys. and if there are more interesting way to speed things up, please tell me, same account on github.

lately, some new interns sent a few merge requests to me, with tons of weird shity bugs. so here it come

TLDR

for practice

  • in postgres, use timestamp with time zone

    • example:add column created_at timestamp with time zone default current_timestamp
  • in node

    • use setUTC functions such as setUTCHours to deal with Date type data;
    • its ok to use type Date directly in prepared statement;
    • its ok to use Date.toUTCString() in sqls for convienience;
    • set timezone manually in cron jobs;

time zone and timestamp

unix time

  • a number like 1619141513 is a standard representation of all time type, which is the exact the passed seconds since 19700101 00:00:00 of gmt
  • its the one and the only. no need to worry about a chinese unix time thing
  • actually its also the lower level of how everyone store a time-based data (but with the millisecond info)
  • notice in js or some other modern language/db, Date type contains millisecond info to suit for more situations, so would use Math.floor(Number(new Date()) / 1000) to get a standard unix time

timezone

  • say +0800 at Asia/Shanghai or +0500 at Asia/Tokyo (US uses different timezones for different states so dont try add your work more)
  • its actually the offset info based on GMT

iso standard

  • a bunch of formats to show time
  • a problem is that the offset is optional
  • with an offset, we can ensure the exact same time. but without it, of course we cant be sure

and in conclude

  • we can easily notice that, in cmd line mode, we can write sqls directly, using pure strings, in stead of actual type(of course we can specific one for each column). there are some sort of converter to translate strings to timestamp type.
    • say insert into "target_table" (created_at) values ('2021-05-05T06:40:36.066Z')
  • for timestamp without time zone type, the converter will ignore any timezone info
    • say insert into "target_table" (created_at) values ('2021-05-05T06:40:36.066+0800') will insert a row with 2021-05-05T06:40:36.066 as created_at colomn, which is actually equal to 2021-05-05T14:40:36.066+0800
  • and whats worse, if you set a default value like now() or current_timestamp, the column will recieve a timestamp based on the server physical location, and cause differences between local development env and production env
  • so in any cases, we dont use timestamp without time zone just for the safety
  • and for the same reason, sql string splicing such as query(`insert into "target_table" (created_at) values (${new Date()})`) is also not a good idea, because you wont know what it will be, since by default, it converts to local date string without timezone info, and lead you to the same situation above
  • so in any cases, we use (new Date()).toUTCString() or even Math.floor(Number(new Date()) / 1000) do splice sql sentences(and in the later case, can solve the problem caused by using a timestamp without time zone type column, in a very limited way, since it wont help the default value problem, again)
  • but in the first place, do the sql splice is a very wrong idea, in most cases we should marry to prepared statement. the database depedency in node will convert a Date type param into a timestamp with correct time zone. thats another subject to discuss though. for some really evil, have to be over optimized sql sentenses, it may not be reasonable to use orm or pure prepared statement
  • ah i hate this, i think we should end here, since its still fun, and ready to become boring lol

why the fk is nexusphp based forum

xixixi.png

Alright in fact, some forums have a rule that if you don’t login for some days, you will be kicked out, to keep users active. Meanwhile those sites are not easy to join in.

And here in china, most of those good forums are hosted by NexusPHP. I don’t know why, php sucks, and the webpages are soooo broken. But here it is lol.

how to do it

First of all, we need to find out related apis. Luckily not much different for most sites.

Most of the sites are using cloudflare to fight against crawlers, that should be concerned. And some of the sites are using some old-fishion captcha system to save money, while some sites should be using god damn it hCaptcha. need to solve those problems too.

the easist part. just press f12 to see which apis are they using. in fact here comes the list:

1
2
3
4
5
const defaultIndex = '/index.php'; // main page inside their websites after login
const defaultLogin = '/login.php'; // login page, not the login api
const defaultTakeLogin = '/takelogin.php'; // real login api
const defaultSignIn = ['/attendance.php', '/sign_in.php', '/show_up.php']; // signin api, to earn some credits everyday
const defaultCaptcha = '/image.php?action=regimage&imagehash=$HASH'; // save-money version captcha lol

captcha

The reason why i need the login page, is that it passes cf-related-cookie and save-money version captcha imagehash.

it seems ok even if i don’t use cf-cookie, but i will still use it like real browsers do, in case of some counts-based anti-crawler rules. i just don’t really care about those rules, anyway i’m acting like a real browser, fetching a bunch of garbage too lol.

for save-money version captcha, there seems too be some kind of pattern: characters come from only 0-9A-Z, the word spacing seems to be fixed.

again hurrah for wasm!!! tesseract now has a node module named tesseract.js. Using the default setting, the accuracy of tess seems not so good, with original images. but i optimized the process with the pattern i found above: chop image into single-character pieces, and use specific recognized mode: recognized as single-character in custome charlist. here comes the repo if you want to know the detail. but i didn’t use url as example says, instead i download image with cf-cookie first and then pass it as stream, for safety.

if you triggered hCaptcha unluckily, here comes a guide to bypass it. basiclly using accessibility bug, pretending you can’t actually see anything lol.

finally

tada, with cf-cookie, your username, password and captchacode, and maybe user-agent in headers too for much safer concern, you can finally login without any creepy pupeteer stuff. after login, you will recieve a bunch of cookies name cf_uid, c_secure_login, balabala. you can use it to visit index page and sign in. you don’t actually need to login every day, you can just save your cookie somewhere safe, and use it to visit index page every day before it expired.

简介

接到了奇奇怪怪的需求,要做一个类似于微信小程序码的圆形码。这里算是早期调研,没有完整地写完,记录一下坑点。

背景

首先查了一下普通二维码的实现原理。实际上扫描二维码很明显斜一点也是能扫出来的,摄像头捕捉到的图形本身就可以不是一个标准的正方形。先通过边缘检测,确定三个位置标识点,再根据三点共面,做矩阵变换,这样就得到了一个标准正方形,信息点就可以按一定规律解码。

当然中间还有很多边界情况和细节需要处理,包括边缘检测的算法、矩阵变换原理及实现、冗余容错等等,这里就不细讲了。这轮子已经有很多了,再撸一个就没什么意思。

技术

这边技术选型是优先考虑前端实现的,考虑到可能需要跨平台,但是实际上全局引入opencv的js包的话,负担比较大,自己重新写吧可能没那条件,这坑我就拜托给小伙伴了。我比较菜(得意个什么劲儿?),就老老实实后端先实现了再说。

后端的话可以用C或者python实现,C稍微试了一下,发现我自己不太行(连个中央库都没有吗!),就选用了python。本质上所有语言的包都是通过官方编译工具生成的,但是你懂的,官方编译指南已经永远地停留在了某个版本。所以我只能老老实实借用一下某个好心大哥哥的pip包版的opencv了。

磨完了刀,就要捋一捋该做的事情了。老板给的码原型图大概是这样子的:三个同心圆,最小的是实心圆,用于定位,次小的透明,不能遮挡背景,最大的存储信息。我隐约觉得有点不靠谱,透明圆的背景干扰悲观一点……就是无限大啊……但是没办法,老板说这是特色,遮挡率低一些,不会像普通二维码一样硬要糊住一大片,行吧,做做看呗。

整体思路上和普通二维码一样,找定位点,矩阵变换,解析。

实现

第一步,找定位点。这步就比正方形的难了,正方形通过边缘检测可以直接识别四个顶点,再根据定位点特征匹配。圆就算识别出来了,也只能确定一个圆心。老板设想可以通过定位圆上开一个豁口来确定方向,但是并没有那样的豁口识别方法啦!我设想的是直接通过模板匹配,给定一个标准摆正的目标图,比对源图和目标图本身的特征点,直接得出变换后的图形,这样可以直接跳到第三步。

第二步的矩阵变换倒是比较简单的一步。提取出4个特征点的图内坐标,和特征点的实际坐标联立解一个矩阵方程就好了,将变换矩阵再代入源图,对每一个点做映射,就得到纠偏后的图像了。

第三步就没开始了。主要第一步的实现效果比较差,豁口方法没有直接能用的API,无疑需要自己写很多东西;模板匹配的话,分辨率和图形复杂度都是很重的影响因素,过于简单的图形甚至摄像头本身的误差就能造成误判。感觉真要做出来可能会要个小半年,花时间在知识积累上。

demo及部分参考资料

demo: https://github.com/test3207/spot2

参考资料:

1.https://docs.opencv.org/

2.https://opencv-python-tutroals.readthedocs.io/en/latest/py_tutorials/py_setup/py_intro/py_intro.html

3.https://www.numpy.org.cn/user/

4.https://blog.csdn.net/qq_33635860/article/details/78046838

5.https://blog.csdn.net/fengyeer20120/article/details/87798638

更新

  • 目前有更合适的证书提供商,同样基于acme.sh,本文以下节仅供参考;
  • 更新或者重新安装最新的acme.sh后,证书提供商默认更改为zerossl,按照引导注册后即可使用;
  • 注意请尽量手动控制dns验证,而非默认的自动,否则依然容易出现dns验证超时的问题(gfw猜想),参考命令:
    • acme.sh --issue --dns dns_ali --dnssleep 30 -d test3207.com -d *.test3207.com
    • 其中 --dnssleep 30 即手动设置不验证dns,只休眠30秒,假装验证成功
  • 更新后似乎解决了旧版定时任务随机失败的问题;

简介

现在https已经很普及了,未来除了兼容需要外,http基本都要转为https。需要关注的问题有这些:为什么证书是必要的?证书有哪些类型?如何优雅地管理证书?本篇主要结合自己的实践,讲一下后面两部分。

需要什么类型的证书

证书类型

证书是对域名的验证。

按验证主体分,证书主要分为DV(Domain Validation)、OV(Organazation Validation)、EV(Extend Validation)。

DV是仅对域名进行验证的类型。比如我告诉你,test3207.com这个域名是我的,你通过https访问该域名,就能获取我的网站内容。这一验证方式只能证明该域名下的内容是属于域名拥有者,并不能证明域名拥有者真实身份。因此,这一验证方式是可以自动化进行的。

OV则包含了对域名拥有者现实身份的验证,通常申请时,需要提供企业真实的相关信息。而EV同样也包含企业身份验证,不同的是根据不同企业的具体需要,会增加更多安全措施,特定机构发行的证书可以被特定的软件所识别。由于需要现实身份验证,这两者都无法做到自动化,需要专人处理。因此需要出一些服务费。

按域名类型分,证书主要分为单域名证书、多域名证书、通配符证书。

单域名证书就是一张证书只验证一个具体的域名:例如有一张 test3207.com 的证书,那么它只对 test3207.com 这一个域名生效,例如 www.test3207.com 这样的域名是无效的。多域名证书与之类似,一张证书内可以包含多个具体的域名。

通配符证书则可以匹配整个三级域名:例如有一张 *.test3207.com 的证书,那么 www.test3207.com 、 blogs.test3207.com 等任意三级域名都是可用的。(遗憾的是这张证书对 test3207.com 本身反而无效,需要按多域名证书的写法把它加进去)

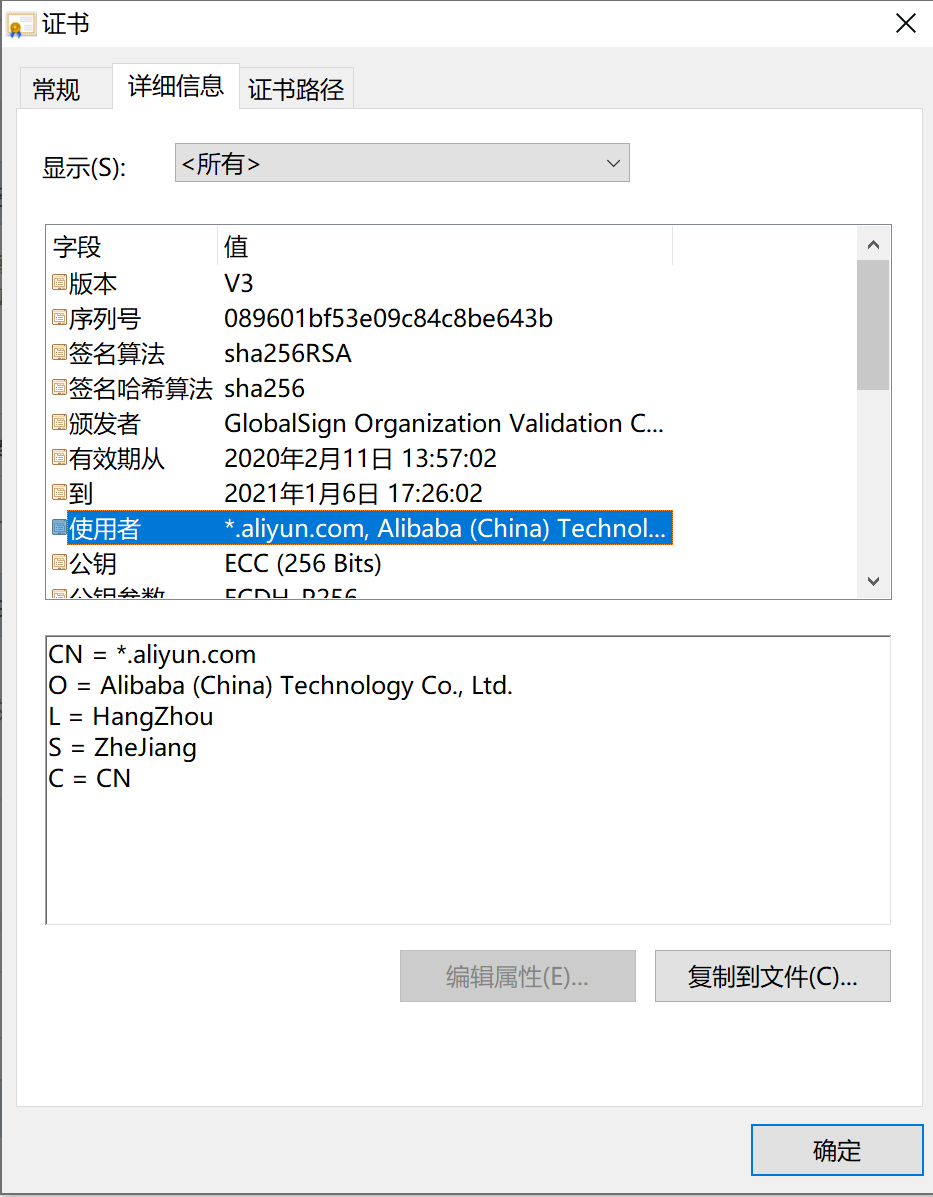
目前任意主流浏览器,地址栏前方有个类似于锁的标示,点击后可以直接查看当前网站的证书信息,例如:

证书.png

可以看到CA机构、起止时间、申请机构等关键信息,是一张EV型的通配符证书。

相比之下,DV型证书提供的信息就不包括申请机构,你可以直接查看本站证书对比。

选择证书

DV和OV(EV)的主要区别在于是否验证现实身份。有意思的是,域名服务商也会记录购买者的一些身份信息,例如注册邮箱、地址,虽然购买者也可以要求域名服务商隐藏这些信息,又或者有些域名服务商会直接显示服务商自己的信息,这也可以作为间接信源。因此,只有涉及直接利益相关、或者意义重大的域名,才有OV(EV)验证的必要。

域名类型首选通配符域名。除非确实只有开设确定的、有限个数服务的必要。多域名证书会对性能造成一定影响,单独为每个服务申请不同的证书,管理上又比较麻烦,前期管理维护的成本可能会稍微多一些,尤其是对于中小企业及个人开发者而言。(写到这里悄悄看了一眼,狗家软家都是单域名,牢厂月饼厂都是通配符,意外地阵营一致233)

简单来讲,DV通配符证书是适用范围最广的一种。

管理证书

CA交互

这里申请的是let’s encrypt的免费CA机构。你需要向CA证明你拥有该域名的所有权,简单来讲就是证明你可以控制该域名的解析。目前一共有两种方式:基于web服务,将某指定子域名指向某指定资源;基于dns,直接解析某子域名为某指定dns记录。我这里要申请的通配符域名只支持dns验证。国外有很多云服务提供商支持直接托管验证,遗憾的是,国内云服务商普遍不支持。所幸整个流程并不复杂:

首先要发送验证请求:本地生成一对sha-256密钥,请求包中包含公钥以及需要验证的域名,返回具体要求的验证方式;

然后在域名服务商处按要求修改对应的地址解析,一般是添加某TXT记录;

随后CA进行验证,到此域名的所有权已验证完毕,这对密钥可以保留30日。

之后就可以正式申请证书。每一张证书还需要单独的一对密钥进行验证,将通配符域名先经过这对密钥的私钥加密,再将整个信息使用前面域名验证的私钥加密,向CA发送以申请证书。CA通过公钥验证后,再用CA自己的签发私钥加密后回传。

LE官方推荐使用certbot进行证书管理,然而其自动化程度有限,dns验证部分,要完全自动化的话,需要自己根据相应的域名服务商提供的API编写对应的脚本。虽然已经有人写出了一些脚本,但是不都是基于shell的,用起来还是多多少少有些不便。这里更推荐使用acme.sh。

  • 安装:
1
curl  https://get.acme.sh | sh
  • 签发:
1
2
3
export Ali_Key="udontknow"
export Ali_Secret="either"
acme.sh --issue --dns dns_ali -d example.com -d *.example.com

这是基于阿里云的一张通配符证书,其他服务商可以参考这里对应修改。

在安装acme.sh时已经加入了cron服务,签发后会定期续期证书,不再需要手动跑命令。

这里可以直接修改~/.acme.sh/account.conf的相应密钥对,当然更推荐整个服务全部docker化,毕竟改cron和随便暴露全局变量对于洁癖来说还是很难忍受的XD。

配置证书

目前主流后端语言都可以直接以https方式启动,在程序内直接载入ssl证书。这样会带来一些运维上的问题,不利于统一维护管理。从运维方便的角度来讲,最好是将证书统一配置在负载均衡层,反代转发时统一使用证书。这里给出一个nginx下的参考样例:

1
2
3
4
5
6
7
8
9
10
11
12
13
14
15
if ($host ~* "^(.*?)\.test3207\.com$") {
set $domain $1;
}
location / {
if ($domain ~* "blogs") {
proxy_pass http://192.168.1.109:6666;
}
if ($domain ~* "disk") {
proxy_pass http://192.168.1.121:6666;
}
proxy_pass http://127.0.0.1:8080;
}
listen 443 ssl;
ssl_certificate /path/to/fullchain.pem;
ssl_certificate_key /path/to/privkey.pem;

证书签发完后,一般是保存在~/.acme.sh/文件夹内,acme.sh官方建议不直接使用该目录,以防后续目录结构更改,而使用

1
2
3
4
acme.sh  --installcert  -d  test3207.com   \
--key-file /path/to/privkey.pem \
--fullchain-file /path/to/fullchain.pem \
--reloadcmd ""

这样的形式,手动将证书复制到指定文件夹内。

如果是直接在主机上运行的话,–reloadcmd参数可以直接填入”nginx -s reload”,签发或续期完成后,会直接运行该命令进行重启。

如果是通过docker的话,只将证书复制到Volumn内,reload在主机,容器内不填参数。主机定时重启nginx。

后话

最终效果是,只要不换服务器和域名,这套东西能用到LE不想干了为止。也正因为这样,整套流程因为用的次数太少有可能忘。写下此文以供参考。

另外,硬要讲的话,还需要考虑LE方访问API频率问题,以及吊销证书问题。实际上很难遇到这种情况。如有需要建议进一步参考LE官方文档

简介

项目地址:https://github.com/test3207/learnPythonInOneDay

提前手动狗头。入门篇只讲基础,web开发、爬虫、数据库统统不讲。阅读本篇建议至少有大学通识C语言基础。

本来不打算发的,然而这次流感回家没带主力开发机,又被迫营业,痛定思痛,还是重写一遍发了吧,以后这种情况,自己回头还能看。

主要内容:

变量与数据类型;常用系统关键字;函数;

常用内建函数和特性;面向对象;错误处理;

模块;IO;常用内建模块;常用三方模块;

没了。每个部分都写成一个python脚本,说明见注释,差不多半小时一篇。(好像node入门也可以用这套结构)

哦哦对了,还有一个最基础的安装,求求你用Windows(10),安装包(3.8.1)点这里,一路下一步,记得有个add to path或者添加到路径的要打勾。然后重启一下就好。如果链接失效而我又没有更新,就在这里手动找。

未完成部分

常用内建函数和特性,常用内建模块,常用三方模块;

都是较为繁琐或者暂时用不到的东西,限于时间和精力,这些内容没有全部完成,后续后空再补。

简介

迫于年纪大了,记不住了,只好新安排了这么一款密码管理软件BitWarden

我看中的原因主要有这么几点:

首先要保证安全的,代码开源+可以自建;目前来讲也不会把很重要的密码放在上面,自建+锁出口端口+必要出口端口监控先观察一段时间;

然后管理方便,chrome直接有插件,PC、手机也有对应的客户端,能做到自动填充而不需要手动复制粘贴;

然后也支持密码本体的一些有用的功能,比如按条件生成密码,以及支持上传文件(密钥);

自建

原版用了C#+mssql,系统占用较高,有人用rust重构了一份,rs版本身也是开源的。目前用这个版本有一些地方和原版不一样,不过无关紧要。rs版跑闲置状态下CPU占用基本为0,内存占用25MB左右。

docker下两行命令解决:

1
2
docker pull bitwardenrs/server:latest
docker run -d --name bitwarden -v /bw-data/:/data/ -p 80:80 bitwardenrs/server:latest

端口号自行替换。

因为原版里要求手动指定证书,rs版也提供了比较详细的证书配置指引。我本来以为程序对证书有什么方面的需要,但是研究了一下发现没有必要,证书仍然是可以统一配置在Nginx层的,对内端口不用改配置。

使用

你可以使用官方的版本,不过免费版的有一些限制;

也可以按上述说明自建,rs版本的注册直接就是高级会员,听说官方的docker不是,搞不清楚,反正官方的我没用;提示:官方的安装流程中,会下载shell脚本,每一步生成的脚本里,curl统统都要单独加”-L”选项,不然是跑不通的,原因在于指定的链接重定向了;

你也可以暂时试用我搭的,请勿滥用,地址是:https://bitwarden.test3207.com

首次使用先通过自建的网页版注册账号,设置主密码。然后下载各端软件使用。

chrome直接搜插件就好了,PC版即使搭了梯子也可能会出现网络问题,我这里是通过Windows Store下载的,安卓在google play也有。

各端的UI基本一致,都是左上角设置服务地址(也就是自建时暴露的地址),输入主密码登录即可。软件本身自带中文,细节自行探索。

简介

低成本的CD,可以自建gitea+drone,服务器最便宜每年要花300块(构建速度就不要太奢求了)。不过既然github现在可以建私有仓库了,又有阿里免费的构建机,这么一配合,白嫖还是挺香的。

阿里的容器镜像服务可以对接阿里自己的code、github、gitlab和Bitbucket(没听过)。

这套东西还是有一些小bug:

比如项目名称包含大写会无法触发自动构建,虽然是不值得提倡的行为,但是工单硬说是feature也是有些emm;

比如构建机偶尔会不稳定,也没有个什么探活或者通知机制,我记得8月份好像有2天这样,只能临时本机构建发版;

比如网络问题,拉包拉不动,一个demo级的项目也要5分钟,这个开发自己优化也不是不行,但是果然还是有些不爽啊(笑);

当然整体上来讲还是挺ok的,对接配置都算是挺方便的,速度也还行。

github是通过oauth授权获取项目权限的,我本来想全部做成一个包自动化来着,这里就只能手动了。

步骤

绑定代码源

登录阿里云,进入阿里云控制台,搜索容器镜像服务,第一次进入时需要手动开通,这个是免费的。找不到登录后直接点这里。这里可能会要求你设置一个密码,在拉取镜像时需要用到。

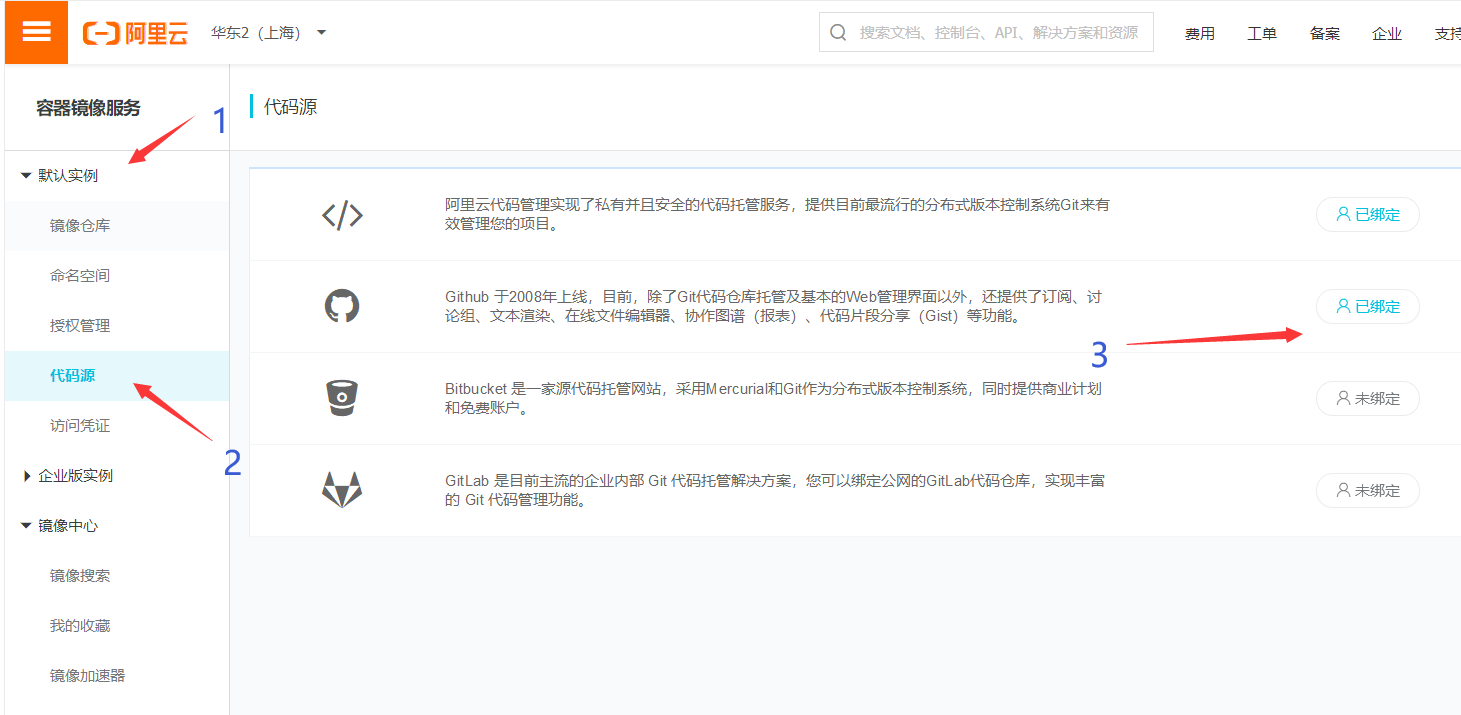
通过左边的菜单,默认实例-代码源,根据你要用的git平台自行绑定,这里我选的是github。如下图所示:

cr-bind.png

创建命名空间

类似于git的命名空间,自己的项目地址都带有自己的命名空间(github就是自己的id),作为和其他人区分的标示。这里最多可以创建5个命名空间。

点击:默认实例-命名空间-创建命名空间。这里就直接写自己的id,不容易冲突。

准备源仓库

这里我就简单写一个示例demo,包括Dockerfile也要自己准备好的。仓库本身是可以设置为私有的,为了方便不熟悉docker的同学我设置了公开。

另外github的私有仓库免费版只支持3人以内的协作者,如果有更多人协作的需求,建议使用阿里自己的code作为代码源。

非常重要:建议把上面fork来的demo里面,index.js文件全局搜索 test3207 ,并全部替换为你自己的id,后续有用到。

创建镜像仓库

点击:默认实例-镜像仓库-创建镜像仓库。经过刚才的步骤,这里要填的信息都有了,自行填写。同样镜像仓库可以设置为私有。

配置构建信息

点击仓库名称或管理,进入配置页面。

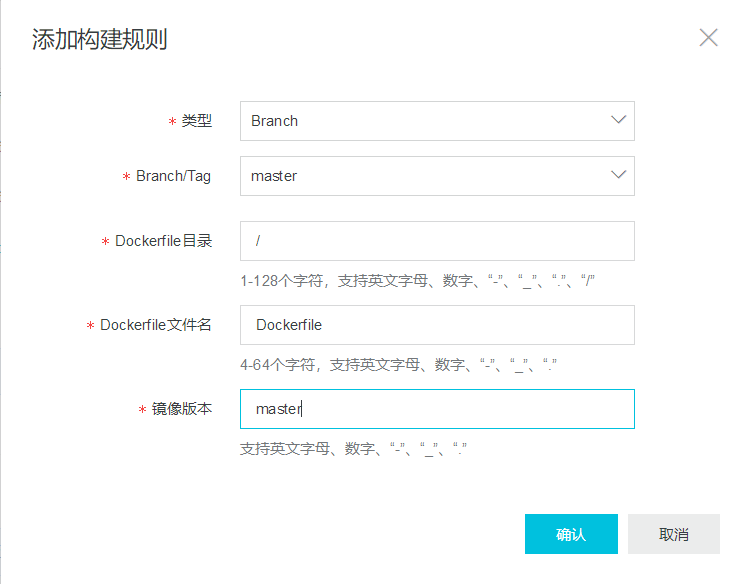
点击构建-添加规则,这里看得懂就自己填,看不懂就照着下面填:

cr-build.png

到这里自动构建的部分就完成了,你可以尝试修改demo文件,将hello world改成hello别的什么东西,再使用git提交你的改动。在这个页面刷新一下,你就可以在下方构建日志里找到正在进行构建的过程了。

等构建完成后,依照基本信息的提示,在本地执行

1
docker pull registry.cn-shanghai.aliyuncs.com/{your namespace}/ali-cr-demo:master

就能获取到构建完成后的镜像了,你可以通过

1
docker pull registry.cn-shanghai.aliyuncs.com/{your namespace}/ali-cr-demo:master && docker run --name ali-cr-demo -p 7023:4396 --restart always -d registry.cn-shanghai.aliyuncs.com/{your namespace}/ali-cr-demo:master

来运行这个镜像,并访问本地4396端口看到“Hello World”。

请注意上面两个命令中的{your namespace}都要替换成你自己的namespace!

配置推送信息

配置推送信息只支持公网域名或者公网ip,本质上就是阿里服务器向你提供的地址发起请求,因此192.168.1.1、127.0.0.1这类的本地IP是完全用不了的。如果你没有公网IP或者服务器,你可以去AWS白嫖一个一年的(比较繁琐);如果你是学生,钱比较少,可以通过学生认证,在阿里云和腾讯云都有很大的优惠,在肯德基打3天工就可以买一个一年的;如果亲亲已经工作了,又不想麻烦又不想出钱的话,这边建议亲亲去睡觉喔,梦里啥都有的呢。

再次提醒:上面要求fork来的demo,全局替换 test3207 为你自己的id,虽然刚才有说。如果你不做的话,就无法继续下去了。

这个demo不仅作为Hello World的展示,也提供接收器的功能,在服务器上拉取fork并替换过id的demo,并通过pm2运行。当然demo里的接收方案比较粗糙,你也可以接入其他的CD服务,本质上这就是一个http服务。

点击触发器-创建。这里名称随意写,触发器 URL填写为:https://{ip}:7023/cr,注意这里的ip替换为你自己的域名或者ip。选择Tag触发-master。

到这里一个简单的CD流程就搭建完成了。最终的效果是,在本地做修改,git push后,阿里自动构建镜像,完成后推送消息到服务器,服务器拉取新镜像并重新部署。

Linux磁盘占用问题排查

这几天生产服务器硬盘空间满了,服务老是挂掉。问了下老同事,一直有这个问题。

基本上生产服务器不会有什么别的东西,一般就是Nginx日志文件默认配置,长期用会吃掉一些空间,但是是可以手动配置最大日志占用空间的;然后可疑的地方大致就是docker。

快速定位问题并暂时修复

所以,总之先df -h看下磁盘占用,果然某overlay占用上天了。赶紧先docker rm掉一些旧的image,虽然只空出来2g左右的空间,但是还是能先把生产服务稳定了。

大体上,这边CICD是配合自建gitlab+自建docker registry,通过swarm来管理的,每一份image都会在生产环境下拉取,再写个定时任务、清理掉2天前的image。

看起来问题不大(除非2天内疯狂发几百个版)(遗憾的是,按照这里的开发规范,这种事情理论上的可行的),所以这里暂时不管了。如果后续要改进,就要考虑权限管理问题,然而讲道理gitlab本身就是有权限控制的啊,所以这本质上……

回来再看看磁盘占用还有什么可以改的

1
docker system df -v

通过命令查看image、container和volume的具体占用情况。

image占用异常的情况,可能就是上述的,不打tag而选择定时任务清理,配合开发流程上的缺陷,这些事件共同促成的。

contanier非常轻量化,很多都是以b为单位的,基本不会出现问题。

volume常见的也是日志文件,或者使用容器时不指定卷名,导致群魔乱舞,又或者甚至是数据库文件(茶)。

没错我看到了一个19gb的volume,明晃晃写着prod_redis……自建redis,开了aof持久化,然而并没有写自动重建,所以aof稳定上升,直到今天。(今天又学到了一种超隐蔽的延时bug了呢!以后接外包不结尾款……)

话不多说,直接讲解决方案:

首先

1
docker system prune -a

清理掉无用的image和container

然后ssh或者docker attach进到redis服务里面

1
redis-cli bgaofrewrite

重建aof文件,整个重建过程会先生成新的aof文件,再删除旧的,因此如果本身一点空间都没有了,是没法重建的,就只能先加硬盘了。手动跑一遍的意义在于确认剩余空间是否足够,并且重置自动重建的阈值。自动重建是根据上一次重建的文件大小的比例来确认重建时机的,因此像现在这么大的aof文件,即使打开自动重建也会达不到阈值无法生效。

最后修改redis启动命令

redis-server
–appendonly
yes
–auto-aof-rewrite-percentage
200
–auto-aof-rewrite-min-size
5gb

设置合适的重建时机。这个本身volume没有命名,问题不大,毕竟redis也不太会更新。